Safe Tree Removal: Essential Tips and Best Practices for Homeowners
Removing a tree from your property is a complex and potentially hazardous task that shouldn’t be underestimated. Each tree, regardless of its size or location, can pose unique risks that may impact both your safety and that of your property. Before grabbing your chainsaw or calling in the professionals, it’s essential to have a strong understanding of the proper tools, techniques, and safety measures needed to ensure everything goes smoothly. Tree removal not only demands careful planning and technical know-how but also a checklist of reliable practices focused on minimizing risks of injury and property damage. If you’re not comfortable tackling the project solo, reaching out to local specialists through tree removal near me is an efficient way to ensure your tree is removed safely, meeting professional standards every step of the way.
Preparation and research are vital to address the technical challenges and minimize dangers that are part of any tree removal job. Understanding the basics and reviewing trusted resources can set you on the right path. To further support your efforts, respected authorities and the International Society of Arboriculture offer invaluable advice on tree removal for safety and best practices during your project. Taking these steps helps you make the most informed decisions, whether you choose a DIY approach or opt for professional support.
Assess the Tree and Surroundings
Before you even touch your equipment, a comprehensive assessment of the tree and its immediate surroundings is absolutely vital. Begin by evaluating the health of the tree—inspect for visible signs of disease such as fungal growth on the bark, large patches of missing bark, dead or hanging limbs, and evidence of rot inside the trunk. Diseased or damaged trees may fall in unpredictable ways and are much less stable than healthy ones. Take this opportunity to also identify the tree’s natural lean, as this factor frequently determines the safest fall direction.
Next, analyze the broader environment. Survey the area for any nearby structures, such as garages, sheds, or your home, and note all hardscapes or landscaping that could be harmed. Check overhead for power lines, as trees in contact with electrical wires are extremely dangerous—the threat of electrocution alone makes these situations ones that should always be left for professionals. Scan for bystanders, pets, or anything else that could enter the drop zone and position warning signs or barriers if needed. Finally, always monitor the weather forecast. Moisture, wind, and storms exponentially increase project risk. Safe tree removal is best performed when environmental conditions are calm and predictable.
Gather Appropriate Tools and Safety Gear
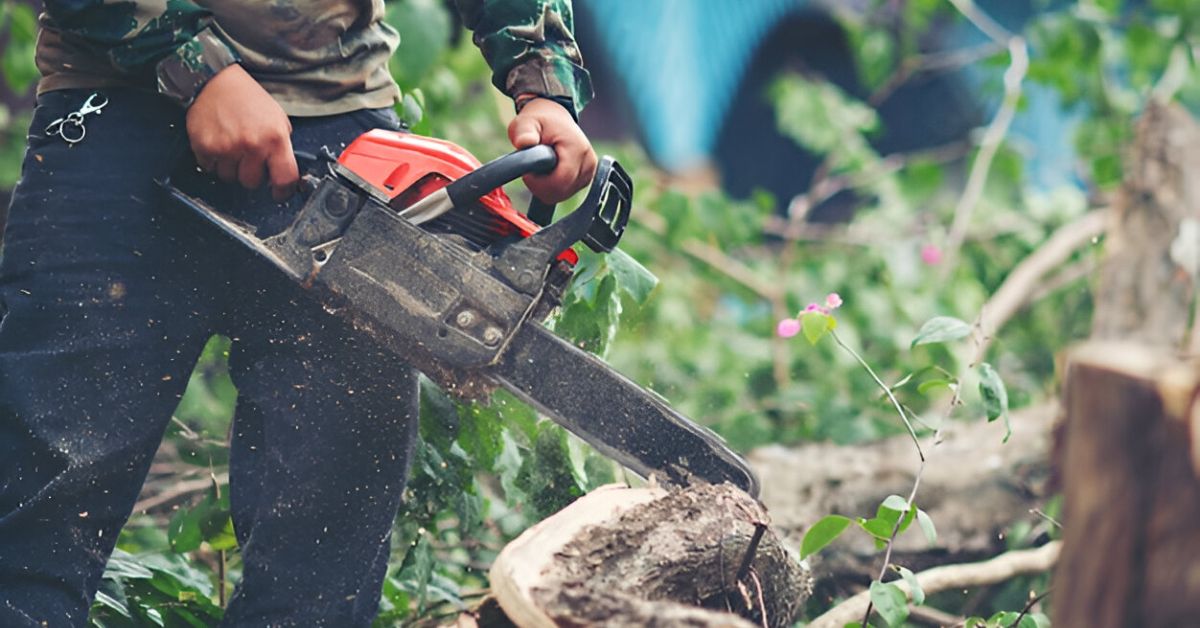
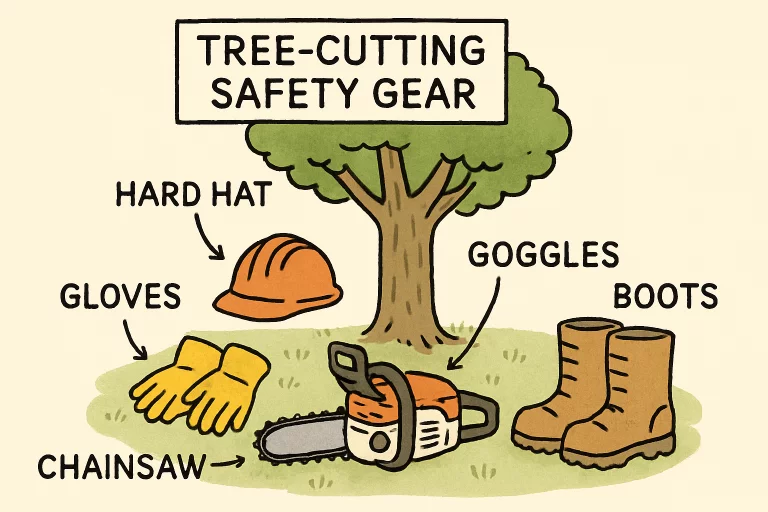
Having the right equipment can make the difference between a successful project and a hazardous one. Assemble all essential tools before you begin; missing a critical piece and improvising increases the potential for mistakes. The most basic toolkit should include a sharp and properly maintained chainsaw of suitable size, safety-rated axes, wedges for controlling the direction of the fall, and heavy-duty ropes or climbing gear for larger trees or when you need to take sections down piece by piece. If the tree’s diameter is considerable, a robust ladder might be required—make sure it’s placed on stable ground well outside the drop zone.
Equally critical is your personal safety gear. Every person involved should wear a hard hat to shield their head from falling limbs, impact-resistant goggles or a face shield to prevent eye injury, comfortable hearing protection to block chainsaw noise, thick gloves for improved grip, a long-sleeved shirt and pants, and steel-toed boots for sure footing and injury protection. You might also consider a safety vest or jacket for added visibility. Inspect all gear beforehand—small faults can have major consequences. These precautions, although time-consuming to assemble, are essential in reducing the chance of serious harm and ensuring you’re equipped to act decisively in any scenario.
Plan the Felling Direction
Strategic planning is the backbone of successful tree felling. Study the tree and decide the path along which it will naturally fall, ideally aligning with both the tree’s natural lean and the safest, most unobstructed area available. Remove any movable objects or landscaping features from this zone, such as outdoor furniture, play equipment, vehicles, or even loose debris that could hinder your escape or trip you up when the tree begins to fall.
Establish at least two unobstructed escape routes at 45-degree angles away from the drop zone, ensuring you can retreat swiftly. It’s important to rehearse your movements and know the route by heart—you’ll only have seconds to act. If you live in a neighborhood setting or your work could affect nearby yards, make sure to give advance notice to neighbors and keep children and pets safely inside or away from the worksite. Clear communication not only prevents needless accidents but also keeps the entire process as stress-free as possible for everyone involved.
Execute Proper Cutting Techniques
1. Make the Notch Cut
The first step begins with a precise notch cut on the side of the trunk facing your chosen fall direction. Use your chainsaw or hand saw to make a 70-degree notch cut about one-third of the way into the trunk, with the bottom of the notch level and even. Doing so allows you to control the tree’s descent and keeps it from splitting or kicking back in an unexpected direction. This notch acts as a visual and physical guide for the rest of the process.
2. Make the Felling Cut
Move to the opposite side of the trunk and create a horizontal felling cut just above the level of the notch’s base. Saw slowly, staying out of line with the potential fall path, and monitor your footing at all times. As you near the final inches, be prepared for the tree’s response—it may begin to shift or lean. Never rush or force your way through a bind, and use only the necessary pressure. If the tree remains upright after the back cut, wedges can help coax it over in a controlled way. Throughout the process, ensure all bystanders stay at a safe distance and remain focused—momentary distractions can lead to injury or property damage.
No matter your experience, constantly assess for hazards: tension in wood, shifting limbs, or unexpected crackling noises. These can be signs that the tree may fall ahead of schedule or in the wrong direction. Keep your escape path clear and always prioritize your safety above anything else.
Post-Removal Cleanup and Stump Management
Even after the tree is safely on the ground, risks persist, so maintain strong situational awareness throughout cleanup. Start by cutting branches and the trunk into smaller, manageable pieces, stacking them out of high-traffic areas to prevent trips and falls. Safely clear brush, twigs, or stray debris, as even small pieces can become hazardous obstacles if overlooked, particularly for children or pets who might wander the site unknowingly. As you progress, scan for nails, glass, or other sharp objects that may have become embedded over time.
With the main debris removed, you’ll want to decide how to handle the stump. Leaving it can attract pests like termites, fungus, or become a tripping hazard. Stump grinding is the fastest, cleanest, and most effective method—most tool rental shops offer grinders if you prefer DIY. Alternatively, chemical stump removers can work over time by accelerating decay, though they require patience and diligence. Removing the stump entirely clears the way for future landscaping or building projects and ensures a hazard-free yard for years to come.
When to Hire Professionals
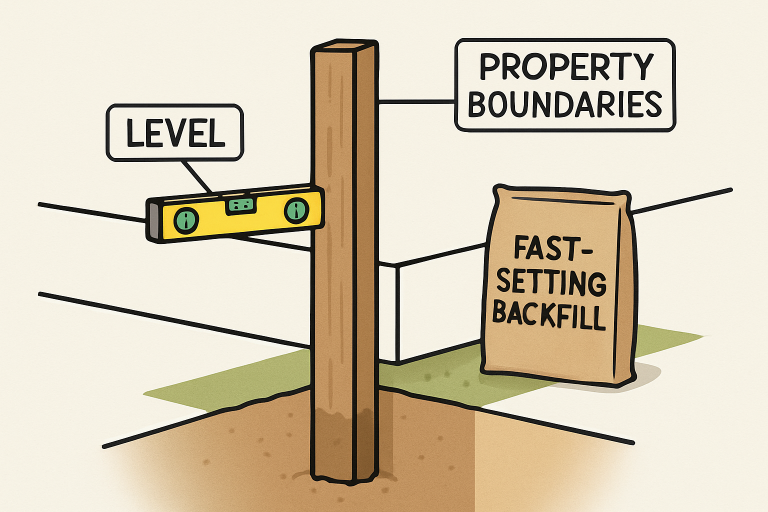
Certain tree removal scenarios carry risks that simply aren’t worth handling alone. If the tree is close to power lines, borders property boundaries, or is extremely tall, the potential for disaster is high. Similarly, trees with badly compromised trunks from disease, rot, or storm damage can collapse unpredictably during cutting. In any of these situations, it’s far safer to leave the work to properly equipped and insured experts. Professional tree removal services have access to aerial lifts, heavy-duty rigging, advanced chainsaws, and most importantly, the experience and training to handle emergencies or surprises safely.
Contracting reputable professionals also ensures you fully comply with local ordinances, insurance requirements, and neighborhood association guidelines. In the long run, hiring a professional can actually save money by avoiding collateral damage, minimizing the risk of legal issues, and preserving your property’s value. For more information on best practices, it’s wise to explore official resources like the Occupational Safety and Health Administration (OSHA) and the International Society of Arboriculture, which offer essential guidelines and safety standards for all aspects of tree care and removal.